
Needlepoint
Needlepoint nibs are for those of us who love writing tiny and in the grids/lines/dots. This grind is one that requires patience and practice, as the very small writing surface of the nib means that this nib has a natural feedback that can feel like sharpness. This nib is not for those who expect to write with a hot knife on butter. A needlepoint nib demands a light hand with almost no pressure at all so that the pointed tines do not dig into the paper and rip up the fibers. So with all the trouble that one needs to go through with a needlepoint nib, what’s the appeal?
First of all, there is no nib that writes finer than a needlepoint nib. Of course, for people who just love to write tiny, needlepoints are an excellent choice, but it can also help train the user to write without pressure and retrain our brains to let go of the bad habits we learned from ballpoint pens.

Moreover, needlepoint nibs have various technical use cases. Reminiscent of the technical pens in the vein of Rapidographs and Rotring technical pens, needlepoints are excellent for technical drawings because of how thin and precise the line width of a nib. While there are different widths of technical pens, a needlepoint will give the thinnest and most sharp possible line at approximately 0.1~0.2mm. Along similar lines, a needlepoint can also be excellent for drawing in styles such as scratchboard illustration, fine shading, and more. On top of that, needlepoints are good for practicing business penmanship due to the fine and precise lines that accentuate the letterforms of handwriting.
Different studios will have different definitions of a needlepoint. At Kyuseido, we always look to create the perfect shape. What this means for the needlepoint nib is that we strive to create a true needle that points downwards in order to minimize the writing surface of the nib. To this end, we first flatten the bottom of the tipping in order to remove any roundness that may cause a wider line width. Then, we take the sides of the nib and grind them down to create a smooth edge from the wings of the nib to the tipping. Note that while every grinding studio will do things differently, we like to start grinding from the wing of the nib in order to maintain the aesthetic balance of the nib itself. This means that plated nibs will have the sides of the nib ground, thus showing the base material underneath. Once we have this done we grind the top of the tipping entirely flat. This will give a tipping shape like a slice of pizza pie, with flat top and bottom, with thickness equivalent or close to equivalent to the nib itself. We then proceed to cut from the top of the nib a slanted curve to the edge of the nib tipping. This is to minimize the contact surface of the tipping. The final cuts made diagonally on the nib to the point of the tipping ensures that the nib won’t catch paper as it moves along the page. Lastly, the nib is smoothed out with final precise rounding of the tip to create a pleasant writing experience.
-
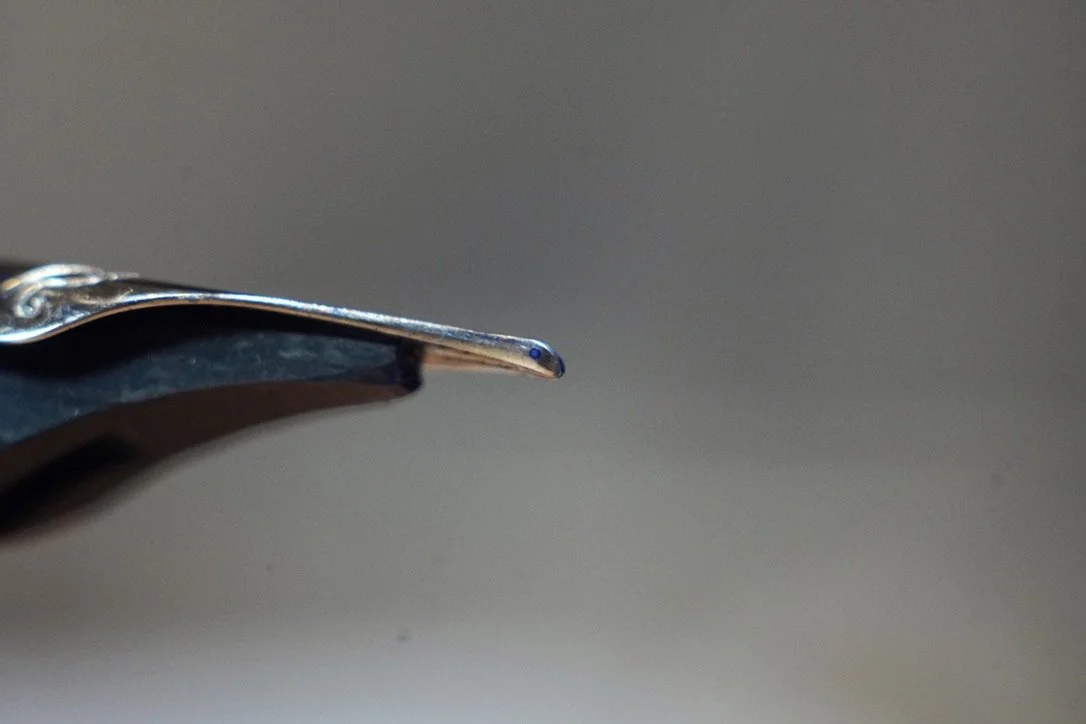
Needlepoint
Excellent for ultra tiny writing, pointed pen practice, and technical drawing